
Introduction
to Dreamweaver and Fireworks -
Creating a web page to hold your work for Desktop Animation
The purpose of this tutorial is:
- To allow you to learn how to open Dreamweaver MX;
- To create an index page for you to use as naviagtion to your projects for Desktop Animation;
- You will then open Fireworks and;
- Create an animated gif;
- And four buttons to use as rollovers on your index page;
- You will return to Dreamweaver MX;
- Place your graphics;
- Create button rollovers for two of the buttons;
- Save your file;
- Finally you will then upload the page and graphics to a server.
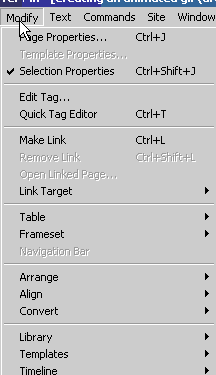
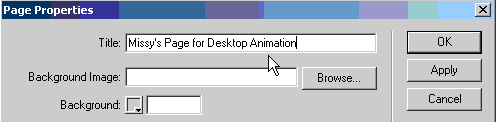
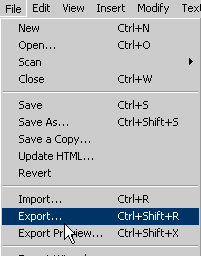
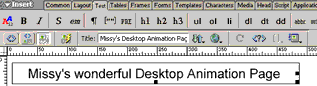
Using Dreamweaver Dreamweaver is a WYSIWYG (what you see is what you get) editor for use in creating web pages. This module is not about teaching you how to make web pages, and it is hoped that you have already taken Introduction to Multimedia Graphics and have an understanding of HTML coding. Step 1 - open Dreamweaver (note, some images may appear difference due to platform differences) Step 2 - Under Modify choose Page Properties Step 3 - Where you see Title - type in the title of your web page
Step 4 - Save this page (on your disk please) as index.html Step 5 - Close Dreamweaver |
 |
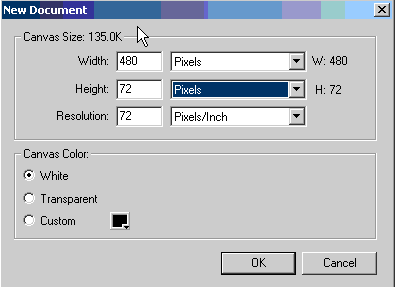
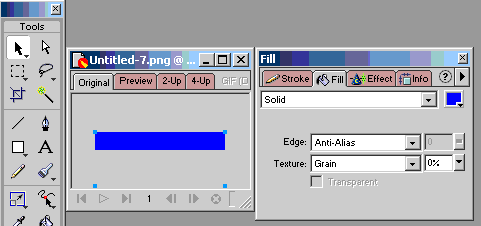
| Using Fireworks Fireworks is a Vector graphics program that was designed especially to create graphics for the web. Creating an animated banner of your name Step 1 - Open Fireworks (note, some images may appear difference due to differences in Software versions and platform differences) Step 2 - Under File - select New. Fireworks will ask you what size canvas you want. I decided to have my banner be 480 pixels by 72 pixels with a resolution of 72 pixels/per inch. The 72 pixels per inch is the standard resolution for web graphics at this time. |
 |
|
 |
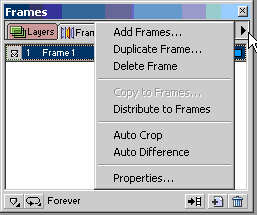
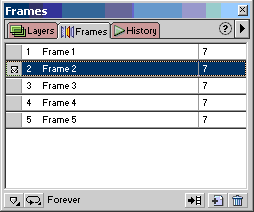
| Step 4 - Locate the
Frames window and
add four frames
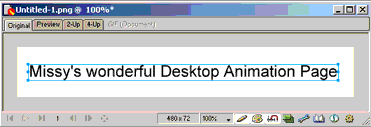
Click on Frame 1 and you will see your original graphic with the text where you originally placed it. Click on Frame 2 and you won't see anything because there is nothing placed on that frame. You can put something new there, or you can modify your original text.
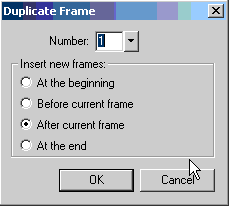
Creating Button Rollovers To create a button rollover you have to create two buttons that are exactly alike except for the feature that appears during the rollover. That feature can be a 'glow' a change in text color, a change in background color... the possiblities are nearly endless. Of course, as in all things web, the possibilities may be endless, but what actually LOOKS good isn't! Let's create two rollover buttons to use on your web page. According to your brief you must label one: Animated Cookie Banner and the other Interactive Birthday Card
|
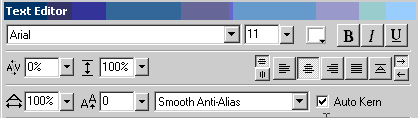
I then
selected the Text tool, and opened the text editor - selected a
white color and typed in the name of my button I exported this image as cookie1.gif I then repeated the process, but this time I changed the color of the text to yellow.
Again, I exported this image as cookie2.gif I did the same thing for the Animated Birthday Card
|
 |
I've now created the graphics that I need for my web page to showcase my work for this semester.
Close Fireworks and open Dreamweaver again. Open your index.html file that you created at the beginning of this tutorial.
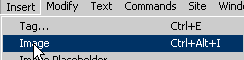
You've got a blank web page! It's now to start adding your graphics and creating a place for you to add any text you wish to add about yourself and why you are taking Desktop Animation. First of all I want to place my animated name gif. Step 1 - Go to Insert and click on Image
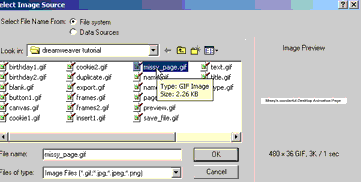
Choose your animated name file
|
Blank
web page
Web
page with image inserted |
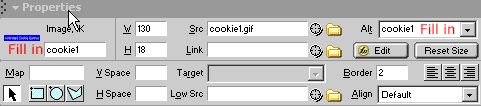
Locate the Properties window Make sure that you fill in the ALT box on the right side of the properties window and the name box on the left side (you'll find out why in a few minutes. You can also use the Properties window also to set the Alignment of your graphic |
 |
You're now ready to add your buttons that will be links to your Animated Cookie Banner and your Animated Birthday Card. You are going to add the buttons and create a rollover behavior for them.
Since you want these buttons to link to the pages where you will add your Animated Cookie Banner and Critical Analysis; and your Animated Birthday Card and Critical Analysis, you need to make the buttons linked to those pages.
First of all you need to create those pages!
Step 1 - save this page! Remember that you are to call it index.html
Step 2 - Create a new Dreamweaver file (review the beginning of this tutorial for how to do that). Save that file: cookie.html
Step 3 - Create another Dreamweaver file and save it as birthday.html
Step 4 - Open your index.html page again.
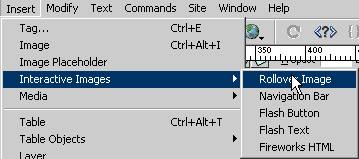
Insterting Rollover buttons Step 1 - Insert your cookie1.gif by clicking on Insert - Interactive Images - Rollover Image
|
 |
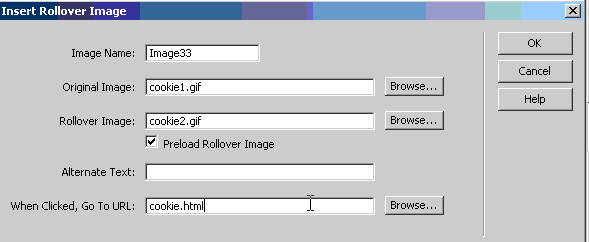
Step 2 - insert the name of your original image and the name of the rollover image Step 3 - add the URL of the page you want the button to go to when clicked Example Repeat these steps for your Animated Birthday Card button Example |
 |
If you need help in uploading
your work to a server you can check out Dr.
Missy's FTP tutorials:
|
|
Home
Page | Dreamweaver/Fireworks Introduction
| Flash Interface | Flash
Tools | Flash Animation | Tweening
| Symbols/Instances | Buttons
| Flash Sounds