
Image maps allow the designer to create graphics that are then transformed into having areas, known as Hotspots, that have a URL attached. When the area is clicked the browser then goes to the URL that is associated with that particular spot on the image.
To create an image map you first have to create the image.
Once that is done,
open the image in Fireworks and select the Hotspot
![]() tool from the toolbar.You will notice that the tool has several options
tool from the toolbar.You will notice that the tool has several options
![]() .
These options are Rectangle, Circle,
and Polygon.
.
These options are Rectangle, Circle,
and Polygon.
The Polygon tool would be used to create a Hotspot on an irregularly shaped area on your graphic.
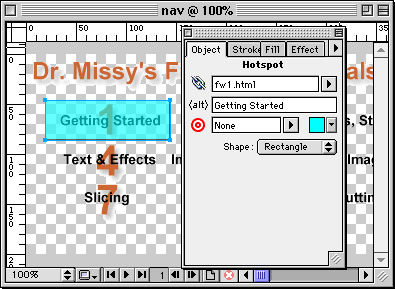
Once you have drawn a Hotspot around a particular area you will then enter the URL associated with that area in the Object window. You have the option of adding an ALT tag, as well as a Target.
You then continue with assigning all the areas where you wish to add Hotspots.
Hotspots can also be associated with paths or objects.
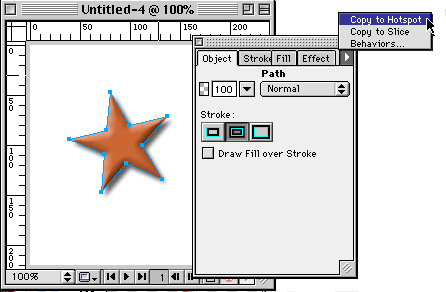
Select the path or object you wish to turn into a hotspot, then click Effect>Copy to Hotspot.
You can then enter the URL associated with that particular area.
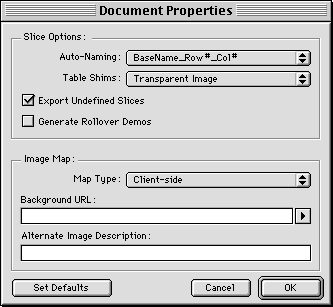
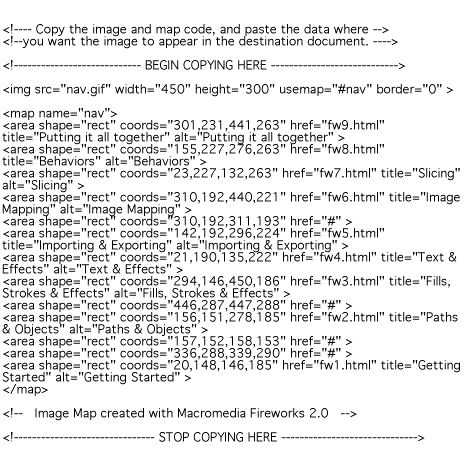
Before you export any image that has Hotspots, you have to set its Document Properties.
File>Document Properties
Once you have Exported this Image you will notice that you have an HTML file as well as the Image. All you have to do is to copy the image and code and paste it into your HTML code and you have an image map!
![]()
Web
Building tutorials: Intro | Fonts
| Backgrounds | Lists
| Layout | Tables
| Graphics | FTP
Photoshop tutorials: Getting
Started | Text | Backgrounds
| Filters | Icons
| Photos & Scanning
Fireworks tutorials: Getting Started
| Paths, Objects | Fills,
Strokes, Effects | Text, Effects |
Import/Export | Image
Map | Slicing |
Behaviors | Putting it all together