
Tweening- Motion Text
| In this exercise you will worth with adding Motion Tweening to text |
Step 1 - Create a new file. On the Stage with the text tool write the phrase: My frog movie
|
 |
| Step 2 - Select the text and choose: Modify > Break apart |  |
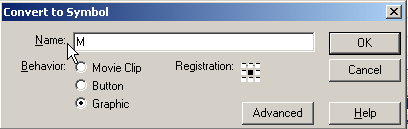
Step 3 - With all the text boxes selected choose This puts each letter on a different layer. With the arrow tool click on the M and in the Properties Inspector convert it to a Symbol with a Graphic Behavior. Name this M and click OK. Repeat this with all the letters |
 |
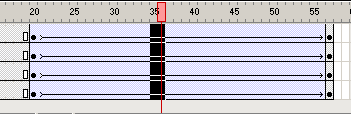
Step 4 - On the Timeline click on frame 20 and drag down all the layers that you've placed a symbol, now add a Keyframe. Notice how you've now added a keyframe to all the layers? Add an additional keyframe at frame 40 for all layers. |
|
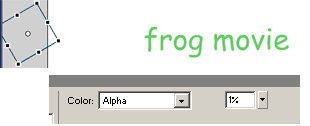
Step 5 - Make sure that all your letters are deselected and with the Framehead on frame 40, drag the letters M and Y (the word My) off the Stage to the work area. |
|
Step 6 - In the Toolbox select the Free Transform and change the scale and rotation of the letters M and Y. In the Properties Inspector change the Alpha to zero. This will have these letters fade out. |
 |
| Step 7 - Change the postion and scale of each of the letters in My Frog Movie. |  |
Step 8 - Click on a frame between your two keyframes and drag down to select all your layers. Add a motion tween. In the Properties Inspector add a Ease of 80 out. |
 |
| Step 9 - Test your movie! |
Home
Page | Dreamweaver/Fireworks Introduction
| Flash Interface | Flash
Tools | Animation | Tweening
| Symbols/Instances | Buttons
| Sounds
Shape Text | Shape
Hinting | Shape Multiples | Shape
Gradients | Motion Basic | Motion
Effects | Motion Multiples | Motion
Guide | Motion Text